Birthday and Special Occasion Calendar
This week I am going to revisit some of the projects I have made for Craft Mad.
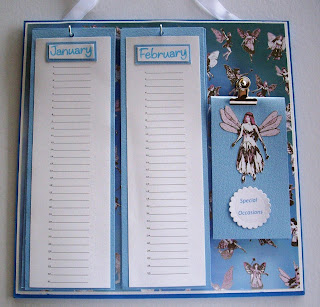
The first one is a swap we did earlier in the year where we swapped a calendar. This is a perpetual calendar for birthdays and special occasions.
The first one is a swap we did earlier in the year where we swapped a calendar. This is a perpetual calendar for birthdays and special occasions.

To make this calendar you will need:
1 piece 30cm x 30cm 3mm mdf board, alternatively heavy card or chipboard could be used.
Two 30cm x 30 cm sheets white Bazzill
One 30 x 30 sheet patterned paper
Three 30 x 30 sheets blue Bazzill
6 sheets white A4 card
Note book
2 screw hooks
1 bulldog clip
Alternatively if you are using chipboard/heavy card you will need 3 bulldog clips
40 cm ribbon
Note: Any colours of your choice may be used. The colours used in these instructions are for the photograph shown and are used purely as a guide .
Cutting Instructions
Check that the thick card/ chipboards or 3mm MDF measures 30cm x 30 cm. (backboard)
Cut white Bazill to measure 29.5 cm. (first layer)
Cut patterned paper to 29 cm. (second layer)
Cut three 10 x 30 cm pieces from the blue Bazzill. Repeat this with both sheets so that you have 6 pieces. (calendar backing pieces)
Cut one 9 x 30 piece of blue Bazzill. (note book)
Cut 12 pieces white Bazzill 9cm x 30 cm (calendars)
Paint or ink the edges for at least 1cm in on thick card / chipboard / mdf. I have used 3mm mdf so I have used paint and have also painted the back. (This will be called the backboard)
To put the calendar together, using double sided tape or glue attach the white card to the backboard, then the patterned paper to the white card.
Using the white A4 card, print the dates of each calendar month of the year with a line after each date for writing names.
Attach these to the blue calendar backing pieces, leaving about 1cm at the bottom and sides. Start with January and go through to June, then turn the pieces over and work backwards December should be on the back of January, November on the back of February etc.
Stamp or print the months of the year onto a small piece of white card and back it with a piece of blue card. Attach these to the top of the relevant calendars then punch a hole in the top centre.
Fold the 30cm x 9cm piece of blue card in half lengthways and insert a small note book inside.
If you are using mdf board you will be able to screw 2 hooks onto the board to hang the calendar, alternatively you can use bulldog clips and hang them from the top of the board.
You can also either screw the bulldog clip into the board to hang the note book half way down the page or hang from the top.
Add a ribbon hanger
Decorate the remaining of the board and the front of the note book as you wish.


Comments